| Version 17 (modified by , 9 years ago) (diff) |
|---|
The Basics
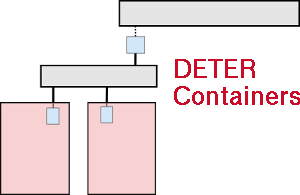
The neo-containers system uses cloud-container technology to abstract and generalize container creation and initialization. At the DETER level, the experiments have a number of "pnodes" which serve as hosts for the virtualized containers and a DETER-wide Chef server at chef.isideterlab.net.
HOWTO run neo-containers
- Checkout the containers repository and switch to the
configdbbranch:users: > cd src users: > git clone ssh://tardis.deterlab.net:/var/local/git/benito containers users: > cd containers users: > git checkout configdb
- Create a containerized experiment with an NS file and the
/share/containers/containerize.pyscript.
In your NS file for each container in the experiment, specify image_os, image_type, image_name, and image_url via the tb-add-node-attribute syntax. Details on each attribute is given below.
image_os- This is really just to distinguish Windows from non-Windows nodes. If theimage_osstarts with "windows", the image will be treated as a Windows node. Otherwise it'll be assumed to be some sort of Unix-y container.image_type- This setting describes the containerization tech of the node. Currently this is *always* set to "vagrant" as Vagrant is the only package used to spin up the containers.image_name- The name of the image. Any containers that share a name will also share an image.image_url- A URL must be specified which the neo-containers system uses to download the container image. This URL must be resolvable from the experiment nodes. The image will only be downloaded once as long as theimage_names are the same for each container. Existing and supported images are Ubuntu 14.04 64 @http://scratch/containers/deter_ub1404_64_vb.boxand Windows 7 @http://scratch/containers/deter_win7.box.
Here is an example that creates Windows and Ubuntu 14.04 containers:
set r2d2 [$ns node]
tb-add-node-attribute $r2d2 containers:image_os windows
tb-add-node-attribute $r2d2 containers:image_type vagrant
tb-add-node-attribute $r2d2 containers:image_name deter/win7
tb-add-node-attribute $r2d2 containers:image_url http://scratch/containers/deter_win7.box

set c3po [$ns node]
tb-add-node-attribute $c3po containers:image_os ubuntu
tb-add-node-attribute $c3po containers:image_type vagrant
tb-add-node-attribute $c3po containers:image_name ubuntu/trusty64
tb-add-node-attribute $r2d2 containers:image_url http://scratch/containers/deter_ub1404_64_vb.box
- Use the NS file to create a containerized experiment using the existing containers scripts (on users):
/share/containers/containerize.py [group] [experiment] [ns file]. Note that the experiment must currently be created in theDetergroup as that's where the custom images are. This will change.
The final NS file will look something like this.
set ns [new Simulator]
source tb_compat.tcl

tb-make-soft-vtype container0 {pc2133 MicroCloud}
set pnode(0000) [$ns node]
tb-set-node-os ${pnode(0000)} CONT-BASE
tb-set-hardware ${pnode(0000)} container0
tb-set-node-failure-action ${pnode(0000)} "nonfatal"

$ns rtproto Static
$ns run
- Modify the NS file generated by
containerize.pyto have a new image for the pnode machines. Navigate to the new experiment page and clickModify Experiment. Change the OS type of the pnodes toPNODE_BASEand the hardware type toMicroCloud. I.e. for each pnode in the NS file, make the lines have the form:tb-set-node-os ${pnode(0000)} PNODE-CONT tb-set-hardware ${pnode(0000)} MicroCloud
Remove all existing tb-set-node-startcmd lines as these start the old containers system.
- Swap in the experiment and wait a long time. There is no great way to tell when the containers are up, unfortunately. Tail the start-cmd output on the
confignode and look for the "complete" message.users: > ssh config.GID.PID config: > tail -F /local/logs/config_startcmd.out
Fun things to do after the containers are running.
- Login to a node:
ssh pnode-0000.ssh username@[nodename]. Cygwin is installed on the Windows node so you can ssh to Windows containers as well.
- Play around with Vagrant. To use: a) ssh to any pnode-XXXX, b)
sudo su -, c)cd /space/vagrant_home- Confirm containers are running:
vagrant status - ssh to a node (windows or no):
vagrant ssh [node name](loginvagrant, passwordvagrant - reboot a container:
vagrant reload [node name]. Or halt then restart a node:vagrant halt [node name],vagrant up [node name]
- Confirm containers are running:
- Login to a Windows desktop:
- build ssh tunnel to port 3389 on the pnode.
ssh -L3389:pcXXX:3389 users.deterlab.net - use client RDP to connect to localhost:3389. Login
vagrant, passwordvagrant.
- build ssh tunnel to port 3389 on the pnode.
- Play around with
knife, the command line interface to Chef.- login to the
confignode - cd to
/space/local/chef/chef-repo - Use knife.
knife node listknife node show [node name]knife --help
- login to the
Execution Flow
The execution flow of is as follows. The initialization uses the existing containers system as a bootstrap.
- Create a containerized experiment with an NS file and the
/share/containers/containerize.pyscript. The NS file should declare aconfignode as an embedded container that uses theUB14-CHEF12image.
- Modify the generated NS file.
- Change the OS type of the pnodes to
PNODE-BASE. e.g. make the line in the NS file:tb-set-node-os ${pnode(0000)} PNODE-BASE - Add a new control node. Traditionally it's been called "config", but there is no restriction on the name. Add this to the NS file:
set config [$ns node] tb-set-node-os ${config} Ubuntu1404-64-STD tb-set-hardware ${config} MicroCloud tb-set-node-failure-action ${config} "nonfatal" - Remove the
tb-node-set-startcmdline. This starts the existing DETER containers system on the nodes. We do not want that.
- Change the OS type of the pnodes to
- Swap in the experiment.
- Run the bootstrap script on your
confignode.- The bootstrap script is called
container_bootstrap.shand it lives in the container source code on theconfigdbbranch at./bin/container_bootstrap.sh. So clone the containers repository, switch to the branchconfigdb, and run the script.
- The bootstrap script is called
The bootstrap script:
- Uses the NFS mounted dir /share/chef/chef-packages to install Chef server and Chef client on the
confignode.- The
confignode is both a Chef server (talks to all machines in the experiment) and a Chef client/workstation (holds the Chef git repo which contains all configuration scripts).
- The
- Configures Chef Server on the
confignode.- Simply runs the chef self-configure scripts.
- Configures Chef client/workstation on the
confignode.- creates a chef-deter identity and organization (keys and names) for the Chef Server.
- installs
giton theconfignode. - git clones the canonical Chef repository from the NFS mounted dir
/share/chef/chef-repo. Thie repo contains all configuration scripts and data for the system. - upload all Chef recipes, data bags, and roles (configuration scripts, data, and roles) to the Chef server on
config(localhost).
- Create an experiment-specific "data bag" and upload it to the Chef Server. The data contains experiment name, project, group, name and address of the
configmachine, and the name and address of the RESTful configuration server. This is per-experiment dynamic data and thus is generated at run time instead of statically kept in the chef repository. - Register the
confignode (localhost) as a Chef client to the server, download and execute all local configuration recipes that exist in the {{config_server}} chef role. (A chef role is simply a collection of recipes.) Details of these are in the next section.
The chef repository defines three roles in the system, config_server, pnode, and container. The code that defines the roles can be found in the ./roles directory in the chef repository.
config_server recipes
Recipes are chunks of Ruby code that is are a mixture of Ruby and the Chef configuration definition language. A recipe is downloaded from a Chef server and run when chef-client is run on a node. This section describes the recipes that are run on the config_server machine itself. These recipes configure Chef communications on the nodes and tell the pnodes to configure themselves. (The pnode role recipe section is next.)
These recipes can be found in the ./cookbooks/config_server/recipes directory in the chef repository.
The config_server role consists of the following recipes, executed in order: config_db, config_server, hosts, bootstrap_pnodes, and configure_containers.
config_db- This recipe builds the configuration database from existing containers and DETER/emulab files found on the local machine. This database contains all the configuration information to configure the experiment. This database is RESTfully served by theconfig_serverprocess started elsewhere. The recipe also installs required packages needed to build the database (python3 and SQLAlchemy).
config_server- This recipe installs and starts theconfig_serverprocess. This server RESTfully serves configuration data to anyone in the experiment that requests it. After installing required packages, the recipe simply calls the standardsetup.pyscript in the config_server package to install it. It then copies a local/etc/initstyle script from the chef repository to/etc/init.d/config_server, then invokes the it, starting the daemon. At this point configuration information requests can be made onhttp://config:5000/...to get configuration information.
hosts- This recipe (which actually lives in thepnodecookbook directory, adds container node names and address information to/etc/hosts. This is a required step for later when theconfig_servernode connects to the containers.
bootstrap_pnodes- This recipe connects to all pnode machines and configures them as chef clients to the new chef server. It then sets the default role for the pnode machines to thepnoderole. Finally it connects to all the pnode machines and invokeschef-clientlocally. This kicks off the next round of configuration in the system - all pnode machines configure themselves. These recipes are described in the next section.
configure_containers- This recipe simply uses the chef toolknifeto connect to all (now running) containers and executeschef-client, which causes the containers to reach out to the chef server and request recipes/roles to execute. After this the containers are fully configured and integrated into DETER.
pnode recipes
The pnode role consists of the following recipes, executed in order: uml-net-group, mount_space, hosts, diod, vde, and vagrant.
uml-net-group- This recipe creates auml-netgroup. This is just a stop-gap recipe which is needed due to a broken apt database in the PNODE-BASE image. This recipe will be removed from the role and the chef repository once the PNODE-BASE image is rebuilt.
mount_space- This recipe formats and mounts the/dev/sda4partition on the disk. This is subsequently used to store and run containers images, the chef repository, etc.
hosts- This recipe creates entries in the pnode's/etc/hostsfor all container nodes.
diod- This recipe installs, configures, and starts thedioddaemon. The pnode has users home directories and other directories mounted locally. The containers also need these mounted to be fully integrated with DETER. Unfortunately it is not possible to use standard NFS mounting on directories that are themselves NFS mounted. (There are good reasons for this.) So the pnode usesdiodto serve these directories to the container nodes. The recipe uses standard package tech to installdiodand configures diod to export all directories that are locally mounted - which is just what we want. It then starts the daemon.
vde- This recipe installs and configuresVDE, Virtual Distributed Ethernet on the pnode. It installs VDE2 and required packages (uml-utilities and bridge-utils). It installs a /etc/init style script to/etc/init.d/vde_switchto control the VDE daemon. It requests all virtual networking configuration information from theconfig_serverand creates a number of VDE configuration files in/etc/vde2/conf.d, one for each switch needed. The recipe creates and configures all the TAP devices and bridges needed by the VDE switches. It then calls the/etc/init.d/vde2script to start all switches. At this point all local network plumbing is there and working.
vagrant- This recipe installs and configuresvagrant. Vagrant is a front-end for configuring and spawning virtual machines. it supports many different virtual machine image (qemu, LXE, VirtualBox?, etc), but the current neo-containers system only uses VirtualBox? images. (It has a few default images already configured and installed on the PNODE-BASE DETER image.) The recipe installsvagrantandvirtualbox(although they are already installed on the PNODE-BASE image, so this is really a NOOP command. After that, it's big job is to create theVagrantfilefile in/space/vagrantthat describes the container images and basic configuration. TheVagrantfilecreated does a few basic things: configure virtual NICs, setup basic networking so the containers route correctly to the DETER control net, and invoke a basic NOOP chef configuration that *only* register the container node with the chef server. It does not invokechef-clienton the containers to configure the nodes, that happens next. The recipe also sets up a few things on the pnode for smoother vagrant operations: avagrantuser and home directory at/vagrantare created, an/etc/profile.d/vagrant.shfile is created with vagrant-specific environment variables, Virtual Box is configured to not store disk image copies on NFS mounted dirs, but in/space/vagrant. Finally/etc/init.d/vagrantis invoked to spawn the containers. At this point, the containers are running, but not configured/integrated into DETER (no user accounts, mounts, etc).
container recipes
The container role consists of the following recipes: apt, hosts, groups, accounts, mounts. All these recipes work to integrate the container into the running DETER experiment.
apt- Runsapt cleanandapt updateon the nodes. It would be nice to get rid of this recipe as it will slam the DETER apt repository server. Need to investigate why and if this is still needed.
hosts- Adds container names and addresses to/etc/hostsso all containers can resolve each others' names.
groups- Requests group information from theconfig_serverand creates the DETER groups on the container.
accounts- Requests user account information from theconfig_serverand recreates the accounts locally on the container. This includes creating mount points for the user home directories.
mounts- This recipe installs the client sidediodpackage and configures it to talk to the local pnode on which the container runs. It requests mount information from theconfig_serverand mounts what it finds viadiod.
Outstanding Issues
This section lists outstanding issues for the container system. And not "outstanding" as in "awesome", but outstanding as in this still has to get done.
diod- The diod daemon (re)mounts NFS mounted filesystems on the containers. The pnode acts is a server, the containers are clients.diodfails to fully mount filesystems sometimes during the application of the mounts recipe. It fails inmount -a. It fails to allocate memory. This only seems to happen when running in chef. Runningsudo mount -aon the command line of the container works just fine. Which is a little annoying, but so it goes.
- Windows - is fragile and doesnt' really work. Working on this now.
- LXC - Does not come up. Looked into this briefly. Tried booting outside of vagrant and still had issues. See here for a getting started doc: https://linuxcontainers.org/lxc/getting-started/
- Using
~glawler- some scripts are still run (via recipes) out of~glawler. They should be fed a path to acontainersrepo or just assume/share/containers. - Vagrant
- Does do some things in parallel, but not bringing up virtualbox machines. This makes things very slow.
- chef provisioning via vagrant does not work well. It registers the node with the chef server, but does not properly setup the node for future runs. Does not create proper
client.rbconfig files.
- everything else.