| Version 23 (modified by , 9 years ago) (diff) |
|---|
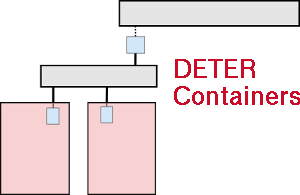
The Basics
The neo-containers system uses cloud-container technology to abstract and generalize container creation and initialization. At the DETER level, the experiments have a number of physical nodes, "pnodes", which serve as hosts for the virtualized containers. Outside of the experiment there are two servers which configure the containers. Both run on chef.isi.deterlab.net. The Chef server serves "code as configuration" and stores static (for the most part) configuration information. The config_server is a RESTful API which loads then serves experiment-specific configuration information. The code that the Chef server runs on the containers usually pull the specific configuration information from the config_server.
The {{{config_server}} code can be found on DETER's Github account. The Chef recipes used are there as well.
HOWTO run neo-containers
Note that much of the detail of the system is still exposed. Users must currently run a script or two. These scripts (or the functionality they contain) will be moved into the system itself in the future and will be hidden.
- Checkout the config_server repository. This has the
config_servercode as well as the script you will use to populate the config server database.users: > cd src users: > git clone https://github.com/deter-project/config_server.git
- Create a containerized experiment with an NS file and the
/share/containers/containerize.pyscript. (There is a mode of neo-containers which does *not* require running the older containerization scripts. This will be documented.)
In your NS file for each container in the experiment, specify image_os, image_type, image_name, and image_url via the tb-add-node-attribute syntax. Details on each attribute is given below.
image_os- This is really just to distinguish Windows from non-Windows nodes. If theimage_osstarts with "windows", the image will be treated as a Windows node. Otherwise it'll be assumed to be some sort of Unix-y container.image_type- This setting describes the containerization tech of the node. Currently this is *always* set to "vagrant" as Vagrant is the only package used to spin up the containers.image_name- The name of the image. Any containers that share a name will also share an image.image_url- A URL must be specified which the neo-containers system uses to download the container image. This URL must be resolvable from the experiment nodes. The image will only be downloaded once as long as theimage_names are the same for each container. Existing and supported images are Ubuntu 14.04 64 @http://scratch/containers/deter_ub1404_64_vb.boxand Windows 7 @http://scratch/containers/deter_win7.box.
Here is an example that creates Windows and Ubuntu 14.04 containers:
set r2d2 [$ns node]
tb-add-node-attribute $r2d2 containers:image_os windows
tb-add-node-attribute $r2d2 containers:image_type vagrant
tb-add-node-attribute $r2d2 containers:image_name deter/win7
tb-add-node-attribute $r2d2 containers:image_url http://scratch/containers/deter_win7.box

set c3po [$ns node]
tb-add-node-attribute $c3po containers:image_os ubuntu
tb-add-node-attribute $c3po containers:image_type vagrant
tb-add-node-attribute $c3po containers:image_name ubuntu/trusty64
tb-add-node-attribute $c3p0 containers:image_url http://scratch/containers/deter_ub1404_64_vb.box
Currently Windows nodes do not get fully configured and a final script must be run by hand on the container.
- Use the NS file to create a containerized experiment using the existing containers scripts (on users):
/share/containers/containerize.py [group] [experiment] [ns file]. Note that the experiment must currently be created in theDetergroup as that's where the custom pnode disk images are. This will change.
- Modify the NS file generated by
containerize.pyto have a new image for the pnode machines. Navigate to the new experiment page and clickModify Experiment. Change the OS type of the pnodes toPNODE_BASEand the hardware type toMicroCloud. I.e. for each pnode in the NS file, make the lines have the form:tb-set-node-os ${pnode(0000)} PNODE-CONT tb-set-hardware ${pnode(0000)} MicroCloud
Remove all existing tb-set-node-startcmd lines as these start the old containers system. This is no longer used.
The final NS file will look something like this.
set ns [new Simulator]
source tb_compat.tcl

tb-make-soft-vtype container0 {dl380g3 pc2133 MicroCloud}
set pnode(0000) [$ns node]
tb-set-node-os ${pnode(0000)} PNODE-BASE
tb-set-hardware ${pnode(0000)} container0
tb-set-node-failure-action ${pnode(0000)} "nonfatal"

$ns rtproto Static
$ns run
- Swap in the experiment.
- Populate the configuration database that runs on
chef.isi.deterlab.netby running the database population scriptsload_containers_db.shandload_config_db.sh(This will automated in the future.) This should be run from a physical node in the experiment. I usepnode-0000in the example below.
On a single pnode:
> ssh pnode-0000.${EXPID}.${PROJID}
> cd [your config_server repository]/bin
> ./load_containers_db.sh -p ${PROJID} -e ${EXPID}
> ./load_config_db.sh
At this point, the Chef server and configuration database knows everything it needs to about your experiment and the nodes within it.
- Let Chef configure the nodes. Bootstrap and configure the pnodes. To configure/bootstrap the node use the
bootstrap_node.shscript. The script needs to know which role the node plays in the experiment. There are currently three roles:pnode,container, andwin-container.
On all the pnodes:
> ssh pnode-0000.${EXPID}.${PROJID}
> cd [your config_server repository]/bin
> ./bootstrap_node.sh -r pnode
The pnode role will spawn the containers and configure them.
Once nodes are bootstrapped, simply running sudo chef-client will re-configure the nodes (both pnodes and the containers) if something should go wrong.
- Remove experiment data from the configuration database once the experiment is complete.
On a single pnode:
> ssh pnode-0000.${EXPID}.${PROJID}
> cd [your config_server repository]/bin
> ./rm_experiment_config.sh -p ${PROJID} -e ${EXPID}
An alternate way to do this is just to make a call on the config_server directly:
curl http://chef:5320/exp/${PROJID}/${EXPID}/delete
Fun things to do after the containers are running.
- Login to a node:
ssh pnode-0000.ssh username@[nodename]. Cygwin is installed on the Windows node so you can ssh to Windows containers as well.
- Play around with Vagrant. To use: a) ssh to any pnode-XXXX, b)
sudo su -, c)cd /space/vagrant_home- Confirm containers are running:
vagrant status - ssh to a node (windows or no):
vagrant ssh [node name](loginvagrant, passwordvagrant - reboot a container:
vagrant reload [node name]. Or halt then restart a node:vagrant halt [node name],vagrant up [node name]
- Confirm containers are running:
- Login to a Windows desktop:
- build ssh tunnel to port 3389 on the pnode.
ssh -L3389:pcXXX:3389 users.deterlab.net - use client RDP to connect to localhost:3389. Login
vagrant, passwordvagrant.
- build ssh tunnel to port 3389 on the pnode.
- Play around with
knife, the command line interface to Chef.- login to the
confignode - cd to
/space/local/chef/chef-repo - Use knife.
knife node listknife node show [node name]knife --help
- login to the
Chef Workstation
Since the system runs on Chef anyone authorized to push chef recipes to the chef server can write custom node configuration code.
Vagrant
The system uses Vagrant to spin up the containers, thus any vagrant supported image run in a container. The image must be downloaded and served via HTTP though.