| Version 47 (modified by , 9 years ago) (diff) |
|---|
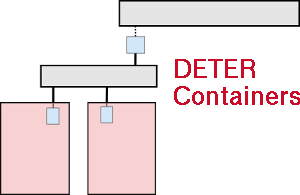
Neo-Containers -- DETER Containers
Section List
- The Basics
- Initial Set-up
- Using Neo-Containers with the Existing Containers System
- Using Neo-Containers While Bypassing the Existing Containers System
- After Booting the Containers
- Experiment Completion
- Extensions to Neo-Containers
1. The Basics
The Neo-Containers system uses cloud-container technology to abstract and
generalize container creation and initialization. At the DETER level, the
experiments have a number of physical nodes, "pnodes", which serve as hosts
for the virtualized containers. Outside of the experiment there are two
servers which configure the containers. Both run on
chef.isi.deterlab.net. The Chef server serves "code as
configuration" and stores static (for the most part) configuration
information. The config_server is a RESTful API which loads then
serves experiment-specific configuration information. The code that the Chef
server runs on the containers usually pull the specific configuration
information from the config_server.
The config_server code can be found on DETER's Github account in the config_server
repository. The Chef recipes used are there as well in the deter-chef repository. (Although the
deter-chef repository is currently private to DETER dev and OPs.)
There are two approaches to running configuring virtual machines in Neo-Containers: leveraging the existing DETER containers system or not. These can be mixed and matched; both can be used to describe the final node and network configuration of the containers in the experiment. If you use the existing containers system. please refer to the DETER Containers Docuementation for details it. If you want to add "non-containerized" nodes to your experiment, you'll have to write a simple JSON formatted configuration file which describes the virtual machines you want to add (IP addresses, hostnames, OS, etc).
2. Adding virtual machines "by hand" to your experiment.
Create a nodes.json File
A nodes.json file must be created that will describe the containers added to the experiment. This file is only used to define the containers for this experiment. (The file need not be named nodes.json, but that is the name that will be used in this documentation.)
The file is a list of node configurations, where each node configuration must have the following fields defined:
- name - This is the name of this container.
- host - This is the pnode in the experiment on which this container will run. Needless to say, this node must exist in the experiment.
- interfaces - This a list of the network interfaces to be assigned
the container.
- image_os - This is really just to distinguish Windows from
non-Windows nodes. If the image_os starts with "windows", the image
will be treated as a Windows node. Otherwise it'll be assumed to be some sort
of Unix-y container.
- image_type - This setting describes the containerization tech of
the node. Currently this is *always* set to "vagrant" as Vagrant is the only
package used to spin up the containers.
- image_name - The name of the image. Any containers that share a
name will also share an image.
- image_url - A URL must be specified which the neo-containers system
uses to download the container image. This URL must be resolvable from the
experiment nodes. The image will only be downloaded once as long as the
image_names are the same for each container. Existing and supported
images are Ubuntu 14.04 64
(at
http://scratch/containers/deter_ub1404_64_vb.box)and Windows 7 (athttp://scratch/containers/deter_win7.box).
The following is an example nodes.json file that creates one Ubuntu 14.04 container and one Windows container:
    [
        {
            "host": "leda",
            "name": "sarah",
            "image_url": "http://scratch/containers/deter_ub1404_64_vb.box",
            "image_os": "ubuntu 14.04 64",
            "image_type": "vagrant",
            "image_name": "deter/ub14",
            "interfaces": [
                { "address": "10.1.1.101", "mac": "de:ad:be:ef:00:be" }
            ]
        },
        {
            "host": "swan",
            "name": "helena",
            "image_url": "http://scratch/containers/deter_win7.box"
            "image_os": "windows",
            "image_type": "vagrant",
            "image_name": "deter/win7",
            "interfaces": [
                { "address": "10.1.1.201", "mac": "de:ad:be:ef:00:af" }
            ]
        }
    ]
Note that this is a list of configurations. In JSON, a list is a comma-separated list of times between square brackets like so: [ item, item ..., item ]. Each configuration block is given as a dictionary with the key/value pairs as above. A JSON dictionary is delimited by { }. So a list of dictionaries is [ { ... }, { ... }, ... ].
3. Tell the Configuration Server about your new Nodes
The Configuration Server needs to know that information in your brand-new nodes.jsonfile. There's a little script just for this: /share/config_server/bin/initialize_containers.py. This script feeds the information from your nodes.json file to the Configuration Server. This must be done before you swap in your experiment for reasons given below. (Note that because the script needs to run before the experiment is swapped in, the script is run on the users machine.
The script asks DETER to allocate control network addresses for your new nodes. These addresses must exist prior to the containers existing as the control network to request configuration information from the configuration server. And due to the way DETER works, the addresses must be allocated before swap in or the addresses will not be properly associated with the containers hostnames. The hostnames are how the Configuration Server talks to your containers. So if the script is not run, the configuration of the new nodes cannot happen. The script can be run multiple times without ill effects. The system is smart enough to only request the control network addresses from DETER once. If the script is re-run, the (non-control-net-IP) information will simply overwrite the existing information in the configuration database.
Below is an example of how to run the script. The <expid> and <projid> fields in the example refer to the experiment ID and the project ID. The experiment ID is defined by the user, and could be something like "neocont-test" or "netstriping". The project ID is the name of the project under which the experiment is run.
$ /share/config_server/bin/initialize_containers.py -p <projid> -e <expid> -f path/to/nodes.json
When run, you'll see output in the terminal. If successful, you will not see any [ERROR]s. [WARN ]s may be OK. Here's sample output:
[PLACEHOLDER FOR IMAGE]
3. Using Neo-Containers with the Existing Containers System
This method of using Neo-Containers uses the existing Containers system. This method allows the use of more complex network topologies.
Create an Experiment
Create an experiment using the existing Containers system. An NS file and the /share/containers/containerize.py script are used to create the containerized experiment.
In your NS file for each container, specify image_os, image_type, image_name, and image_url via the tb-add-node-attribute syntax. Details on each attribute are given below.
- image_os - This is really just to distinguish Windows from
non-Windows nodes. If the image_os starts with "windows", the image
will be treated as a Windows node. Otherwise it'll be assumed to be some sort
of Unix-y container.
- image_type - This setting describes the containerization tech of
the node. Currently this is *always* set to "vagrant" as Vagrant is the only
package used to spin up the containers.
- image_name - The name of the image. Any containers that share a
name will also share an image.
- image_url - A URL must be specified which the neo-containers system
uses to download the container image. This URL must be resolvable from the
experiment nodes. The image will only be downloaded once as long as the
image_names are the same for each container. Existing and supported
images are Ubuntu 14.04 64
(at
http://scratch/containers/deter_ub1404_64_vb.box)and Windows 7 (athttp://scratch/containers/deter_win7.box).
The following is an example NS file that creates one Windows container and one Ubuntu 14.04 container:
    set r2d2 [$ns node]
    tb-add-node-attribute $r2d2 containers:image_os windows
    tb-add-node-attribute $r2d2 containers:image_type vagrant
    tb-add-node-attribute $r2d2 containers:image_name deter/win7
    tb-add-node-attribute $r2d2 containers:image_url
    http://scratch/containers/deter_win7.box

    set c3po [$ns node]
    tb-add-node-attribute $c3po containers:image_os ubuntu
    tb-add-node-attribute $c3po containers:image_type vagrant
    tb-add-node-attribute $c3po containers:image_name ubuntu/trusty64
    tb-add-node-attribute $c3p0 containers:image_url
    http://scratch/containers/deter_ub1404_64_vb.box
Containerize the Experiment
Use the NS file to create a containerized experiment using the existing Containers scripts.
$ /share/containers/containerize.py
Note: The experiment must currently be created in the Deter group as that's where the custom pnode disk images are. This will change.
Finalize the NS File
Modify the NS file generated by containerize.py to have a new image for the pnode machines.
Follow these steps in your browser:
- Go to the new experiment page.
- Click Modify Experiment.
- Remove all existing tb-set-node-startcmd lines.
These start the old Containers system and are no longer used. - For each pnode, change the OS type to PNODE_BASE.
- For each pnode, change the hardware type to MicroCloud.
After making these modifications, each pnode in the NS file should have these lines:
    tb-set-node-os ${pnode(0000)} PNODE-BASE
    tb-set-hardware ${pnode(0000)} MicroCloud
The final NS file will look something like this:
    set ns [new Simulator]
    source tb_compat.tcl

    tb-make-soft-vtype container0 {dl380g3 pc2133 MicroCloud}
    set pnode(0000) [$ns node]
    tb-set-node-os ${pnode(0000)} PNODE-BASE
    tb-set-hardware ${pnode(0000)} container0
    tb-set-node-failure-action ${pnode(0000)} "nonfatal"

    $ns rtproto Static
    $ns run
Swap In
On the experiment's webpage, swap in the experiment.
Populate the Configuration Database
Populate the configuration database that runs on
chef.isi.deterlab.net by running the load_containers_db.sh
and load_config_db.sh database-population scripts.
This should be run on a single physical node in the experiment.
pnode-0000 is used in the example below.
The <expid> and <projid> fields in the following example are referring to the experiment ID and the project ID. The experiment ID is defined by the user, and could be something like "neocont-test" or "netstriping". For now, the project ID should always be "Deter".
    $ ssh pnode-0000.<expid>.<projid>
    $ cd <config_server-repo>/bin
    $ ./load_config_db.sh
    $ ./load_containers_db.sh -p <projid> -e <expid>
This step will be automated in the future.
Node Configuration by Chef
The Chef system is used to bootstrap and configure the nodes. All the steps for this are enclosed in the bootstrap_node.sh script.
The script needs to know which node's role in the experiment. There are currently three roles: pnode, container, and win-container.
On all the pnodes which will be running containers:
    $ ssh <pnode>.<expid>.<projid>
    $ cd <config_server-repo>/bin
    $ ./bootstrap_node.sh -r pnode
The pnode only have to be bootstrapped once per experiment swap in. Once a pnode is bootstrapped into chef, chef-client needs to be run. The pnode role will spawn the containers and configure them. So once the chef-client command is run on a pnode, all containers on that be pnode will be running and configured.
    $ ssh <pnode>.<expid>.<projid>
    $ cd <config_server-repo>/bin
    $ sudo chef-client
It is easy to fix problems if something should go wrong with bootstrapped nodes. Running "sudo chef-client" will re-configure the nodes (both pnodes and the containers).
Set-up Complete
If all the preceding steps succeeded, then your pnodes and containers are configured, booted, and ready for use.
Swap In
On the experiment's webpage, swap in the experiment.
Populate the Configuration Database
Populate the configuration database that runs on
chef.isi.deterlab.net by running the load_containers_db.sh
and load_config_db.sh database-population scripts.
This should be run on a single physical node in the experiment.
pnode-0000 is used in the example below.
The <expid> and <projid> fields in the following example are referring to the experiment ID and the project ID. The experiment ID is defined by the user, and could be something like "neocont-test" or "netstriping". For now, the project ID should always be "Deter".
    $ ssh pnode-0000.<expid>.<projid>
    $ cd <config_server-repo>/bin
    $ ./load_config_db.sh
This step will be automated in the future.
Node Configuration by Chef
The Chef system is used to bootstrap and configure the nodes. All the steps for this are enclosed in the bootstrap_node.sh script.
The script needs to know which node's role in the experiment. There are currently three roles: pnode, container, and win-container.
On all the pnodes which have containers running on them:
    $ ssh <pnode>.<expid>.<projid>
    $ cd <config_server-repo>/bin
    $ ./bootstrap_node.sh -r pnode
The pnode only have to be bootstrapped once per experiment swap in. Once
a pnode is bootstrapped into chef, chef-client needs to be run.
The pnode role will spawn the containers and configure them. So
once the chef-client command is run on a pnode, all containers
on that be pnode will be running and configured.
    $ ssh <pnode>.<expid>.<projid>
    $ cd <config_server-repo>/bin
    $ sudo chef-client
It is easy to fix problems if something should go wrong with bootstrapped nodes. Running "sudo chef-client" will re-configure the nodes (both pnodes and the containers).
Set-up Complete
If all the preceding steps succeeded, then your pnodes and containers are configured, booted, and ready for use.
5. After Booting the Containers
There are a number of things that may be done after the containers are configured and booted. These include the following:
- Login to a container node
    $ ssh pnode
    $ ssh username@containernode
Cygwin is installed on Windows nodes so you can ssh to Windows containers as well. - Play around with Vagrant
Vagrant is used to control and access the container nodes. Vagrant is used from a root shell ("sudo su -") and from the /space/vagrant_home directory.Command Purpose vagrant status confirm containers are running vagrant ssh containernode login "vagrant"; password "vagrant" vagrant reload containernode reboot a container vagrant halt containernode halt a container vagrant up containernode boot a container - Login to a Windows desktop
- build ssh tunnel to port 3389 on the pnode
$ ssh -L3389:pcXXX:3389 users.deterlab.net - use client RDP to connect to localhost:3389
login "vagrant"; password "vagrant" for an Administrator shell or login [your user id]; password "password" for normal user access.
- build ssh tunnel to port 3389 on the pnode
6. Experiment Completion
After an experiment is complete, the experiment data must be removed from the configuration database. There are two ways this may be done.
Method 1: On a host which can talk to chef.isi.deterlab.net,
run these commands:
    $ cd <config_server-repo>/bin
    $ rm_experiment_config.sh -p <projid> -e <expid>
Method 2: The config_server may be called directly:
$ curl http://chef:5320/exp/<projid>/<expid>/delete
7. Extensions to Neo-Containers
Chef Workstation
Since the system runs on Chef anyone authorized to push chef recipes to the chef server can write custom node configuration code.
Vagrant
The system uses Vagrant to spin up the containers, thus any Vagrant-supported image can run in a container. However, the image must be downloaded and served via HTTP.
Windows 7 Example
This example shows how to bring up Win7 nodes. It does not use the old containers system. It has two nodes in a single LAN, then spins up a single Win7 node on each.
NS file with two nodes, both running the PNODE-BASE image.
set ns [new Simulator]
source tb_compat.tcl

tb-make-soft-vtype container0 {pc2133 MicroCloud}

set base1 [$ns node]
tb-set-node-os $base1 PNODE-BASE
tb-set-hardware $base1 container0
tb-set-node-failure-action $base1 "nonfatal"

set base2 [$ns node]
tb-set-node-os $base2 PNODE-BASE
tb-set-hardware $base2 container0
tb-set-node-failure-action $base2 "nonfatal"

set lan1 [$ns make-lan "$base1 $base2" 100Mb 0.0ms DropTail]
tb-set-ip-lan $base1 $lan1 10.0.0.1
tb-set-ip-lan $base2 $lan1 10.0.0.2

$ns rtproto Static
$ns run
Create a new experiment with the NS file above. *Do not* swap in the experiment.
We run the configuration server on the chef node by hand in order to confirm things are working. Do the following in a separate window so we can see the log output and confirm things are working. If there is a config_server already running, kill it first.
users: > ssh chef
chef: > cd src/config_server
chef: > git pull ~chef-user/config_server   # grab the newest code from chef-user.
chef: > ./runserver.py -l debug -d $(pwd)/config.db    # full path to DB
Create a nodes.json file which describes the Win7 nodes to create:
[
        {
                "host": "base1",
                "name": "billg",
                "image_url": "http://scratch/containers/deter_win7.box",
                "image_os": "windows",
                "image_type": "vagrant",
                "image_name": "deter/win7",
                "interfaces": [
                    { "address": "10.0.0.101", "mac": "de:ad:be:ef:00:bf" }
                ]
        },
        {
                "host": "base2",
                "name": "ballmer",
                "image_url": "http://scratch/containers/deter_win7.box",
                "image_os": "windows",
                "image_type": "vagrant",
                "image_name": "deter/win7",
                "interfaces": [
                    { "address": "10.0.0.102", "mac": "de:ad:be:ef:00:c1" }
                ]
        }
]
Note that the Win7 nodes are in the same subnet at the physical nodes.
Load the Win7 nodes' configuration into our configuration server running on chef. This must be done *before* swapping in the experiment as the configuration server must request control network addresses from DETER.
users: > /share/config_server/bin/initialize_containers.py -p deter -e neo-win7 -f neo-win7.nodes.json -l debug
Note that neo-win7.nodes.json is the JSON file above and we use the port of our own config_server. You should see log activity in your config_server window.
Output should not contain [ERROR] or [WARN] messages. Here's an example of a good run:
01-27 09:29:11 __main__     INFO     Log level set to debug
01-27 09:29:11 __main__     DEBUG    using base url: /exp/deter/neo-win7/insert
[OK   ] : Initializing containers from neo-win7.nodes.json for use in experiment deter/neo-win7
01-27 09:29:11 __main__     DEBUG    sending url: http://chef:5320/exp/deter/neo-win7/insert/containers
[OK   ] : upload_node_file: Connecting to server chef:5320
[OK   ] : upload_node_file: Posting node data ... url=/exp/deter/neo-win7/insert/containers
[OK   ] : Upload_node_file: Getting Response
[OK   ] : Good response from server. Message: Nodes added: billg, ballmer
[OK   ] : All is well. Nodes initialized.
You should see the win7 nodes from your nodes.json file added. (This is the "Nodes added: billg, ballmer" above.)
Now swap in the experiment:
users: > swapexp -wNe deter,neo-win7 in
Once swapped in, we give the swap-in-specific details to the configuration database (groups, users, mounts, etc). This only needs to be done once per experiment swapin. We do this so the containers know the experiment/swapin specific information. We cannot do this before swapin as the information does not exist then!
users: > ssh base1
base1: >  /share/config_server/bin/initialize_configuration_database.py -p deter -e neo-win7 -l debug   # note same port and chef server.
You should see log messages in your config_server window, user ids, mounts, group information for the experiment will scroll by.
Successful output will contain one [WARN] message. We get this warning because the script did not find a proj/deter/exp/neo-win7/containers directory. This directory is created by the old containers system. Because we're not using that system in this example, this warning is OK. Here is the successful output:
OK   ] : Initializing configuration database from experiment deter/neo-win7 data.
[OK   ] : Posting mounts data...
01-27 10:18:51 __main__     DEBUG    posting url: /exp/deter/neo-win7/insert/mounts
[OK   ] : Connecting to server
[OK   ] : Good response from server.
[OK   ] : Success loading mount information.
[OK   ] : Posting accounts data...
01-27 10:18:51 __main__     DEBUG    posting url: /exp/deter/neo-win7/insert/accounts
[OK   ] : Connecting to server
[OK   ] : Good response from server.
[OK   ] : Success loading account information.
[OK   ] : Posting physical node names data...
01-27 10:18:51 __main__     DEBUG    posting url: /exp/deter/neo-win7/insert/pnode_names
[OK   ] : Connecting to server
[OK   ] : Good response from server.
[OK   ] : Success loading physical node names.
[WARN ] : No containers information found at /proj/deter/exp/neo-win7/containers. Not loading containers information.
[OK   ] : All is well. Configuration database now contains information about experiment deter/neo-win7.
Now we confirm that chef is ready to run, by confirming that the cookbooks are loaded into the running chef instance. (This does not need to be done if you know chef is configured properly. This is here for completeness.)
users: > ssh chef
chef: > sudo su - chef-user
chef: > cd ~/chef-repo
chef: > knife cookbook list
This will show about 5 to 7 cookbooks loaded. If not, load them. (Note you can reload them if you want to be sure all is well.)
users: > ssh chef
chef: > sudo su - chef-user
chef: > cd ~/chef-repo
chef: > knife cookbook upload --all
Now everything is set to start chef on the base node. On each base node, run the bootstrap_node.sh script to bootstrap the base node into the chef system. Once bootstrapped, we can run chef-client to configure the base node.
users: > ssh base1
base1: > /share/config_server/bin/bootstrap_node.sh -s chef -p 5323 -r pnode
When running, you should see logging in the config_server window.
Now start chef-client on the base node.
users: > ssh base1
base1: > sudo chef-client
There will be a bunch of output. You can see various chef cookbooks loaded and executed. The output will pause for a long time on execute[vagrant up --parallel] action run. This statement is the virtual machines booting on the base node. This will take a *long* time, 10 minutes or more. This step is starting the win7 virtual nodes *and* having the win7 nodes also chef-bootstrap and chef-configure themselves. Unfortunately there is no easily observable log output for these events. Once chef-client completes, the Win7 nodes should be up and accessible in the experiment.
You can confirm the node is up by using vagrant to ssh to it:
users: > ssh base1
base1: > sudo su -
base1: # cd /space/vagrant_home
base1: # vagrant status
base1: # vagrant ssh billg    # ssh is installed on the Win7 image
# password is "vagrant"
$ uname -a
CYGWIN_NT-6.1 billg 2.2.1(0.289/5/3) 2015-08-20 11:40 i686 Cygwin
$
There should also be an RDP instance running on the base node, waiting for connections. Create a tunnel to the node and point your RDP client at post 3389.
workstation: > ssh -L3389:cpc75:3389 users.deterlab.net -N
Open your RDP client and point to localhost:3389. Username "vagrant" password "vagrant". If there were no errors in the win7 chef configuration, you should also be able to login with your DETER user id and password "windows".