| Version 4 (modified by , 12 years ago) (diff) |
|---|
Users Guide / Tutorial
This document describes the workflow and commands to create an use a containerized experiment. We work through a couple examples showing the major features of the containers system. Detailed descriptions of the commands and configuration files are in the reference section?.
A Conatinerized Experiment
This example will walk through creating an experimental topology starting with how to describe a topology through building and using the containerized experiment.
Describing the Topology
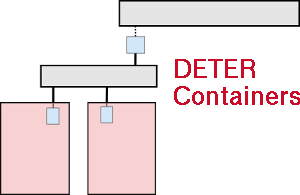
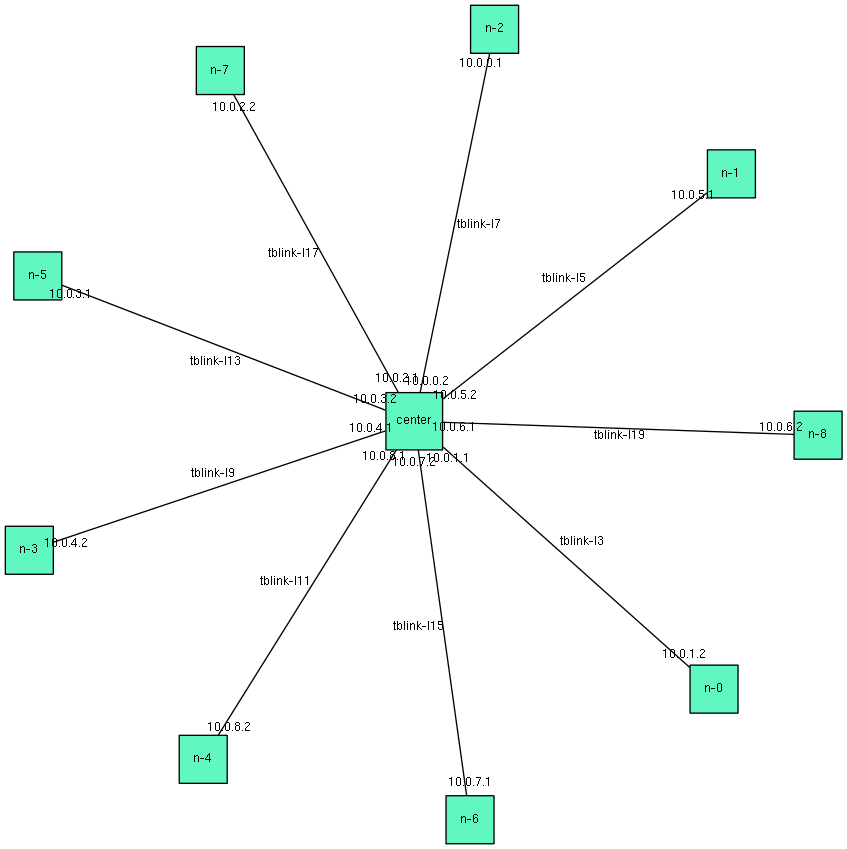
Our first example is a star topology. We create a central node and connect 10 other nodes to it. It looks like this:

For this example we will use the standard DETER topology descriptions. If you have never used DETER, you should work through the DETER tutorial first. The container system is largely compatible with the physical DETER interface.
A DETER-compatible ns2 description of that topology is [attachnemt:example1.tcl attached to this page]. You can download it to users.isi.deterlab.net and follow along. It is a simple loop, along with the standard DETER boilerplate. This file can be used to create a 11-node (10 satellites and one central node) physical experiment on DETER, although there are not many physical nodes on DETER with 10 interfaces.
source tb_compat.tcl
set ns [new Simulator]

# Create the center node (named by its variable name)
set center [$ns node]

# Connect 10 satellites
for { set i 0} { $i < 10 } { incr i} {
    # Create node n-1 (tcl n($i) becomes n-$i in the experiment)
    set n($i) [$ns node]
    # Connect center to $n($i)
    ns duplex-link $center $n($i) 100Mb 10ms DropTail
}

# Creation boilerplate
$ns rtptoto Static
$ns run
With the detailed experiment description in front of us, we see a few more details. The central node is named "center" and each satellite is names "n-0", "n-1"... through "n-9". Each connection is a 100 Mb/s link with a 10ms delay. The round trip time from n-0 to center will be 20 ms and from n-0 to n-1 will be 40 ms.
Creating The Containerized Experiment
The container system will build the containerized experiment on top of a DETER physical experiment. We do this by running a command from the shell on users.isi.deterlab.net. With a copy of the example topology in your home directory, the following command will create the containerized experiment:
$ /share/containers/containerize.py DeterTest exmaple1 ~/example1.tcl
The first two parameters are the project and experiment name to hold the DETER experiment. This invocation will create an experiment called experiment1 in the DeterTest project. As with any DETER experiment, you must be a member of the project with appropriate rights to create an experiment in it. containerize.py expecte there to be no experiment with that name, and it will fail if one exists. To remove an experiment you can terminate it through the web interface or use the endexp command. Terminating an experiment is more final than swapping one out, so be sure that you want to replace the old experiment. You can also resolve the conflict by renaming your new containerized experiment.
The last parameter is the file containing the topology. That can be an ns2 file, like our example, or a topdl description. An ns2 description must end in .tcl or .ns.
With these default parameters containerize.py will put each node into an Openvz container with about 10 containers per physical node.
Running the command above on users -- make sure you run it with a project you are a member of -- yields:
users:~$ /share/containers/containerize.py DeterTest example1 ~/example1.tcl
Containerized experiment DeterTest/example1 successfully created!
Access it via http://www.isi.deterlab.net//showexp.php3?pid=DeterTest&eid=example1
Now we can see what a containerized experiment looks like.
The Contents of a Containerized Experiment
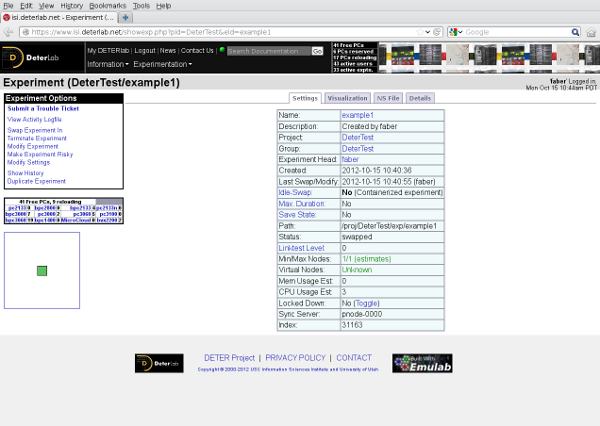
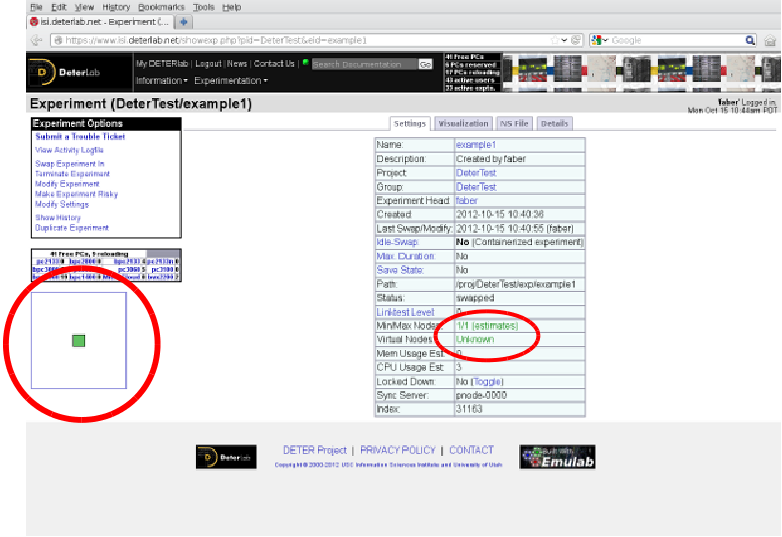
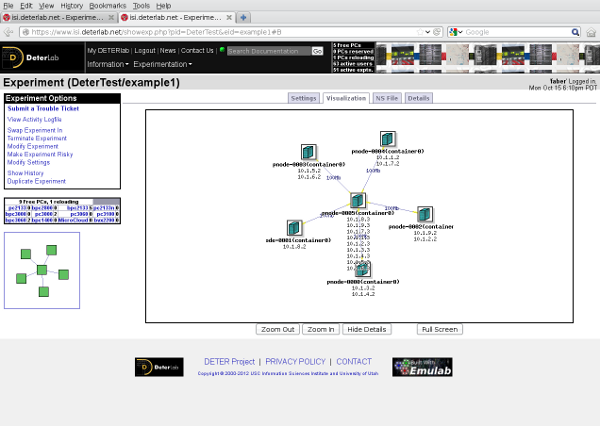
If you follow the link to that containerize.py prints, you will see a standard DETER experiment page that looks like this:

This may surprise you. In particular, you may be surprised to see that DETER thinks the experiment has only one node:

The containers system has rewritten the description file and stored additional information in the experiment's per-experiment directory that will be used to create the 11 node experiment inside the single-node DETER experiment. If you look at the ns file DETER has stored (the NS file tab on the experiment page), you will see this file:
set ns [new Simulator]
source tb_compat.tcl

tb-make-soft-vtype container0 {pc2133 bpc2133 MicroCloud}
set pnode(0000) [$ns node]
tb-set-node-os ${pnode(0000)} CentOS6-64-openvz
tb-set-hardware ${pnode(0000)} container0
tb-set-node-startcmd ${pnode(0000)} "sudo /share/containers/setup/hv/bootstrap /proj/DeterTest/exp/example1/containers/site.conf >& /tmp/container.log"
tb-set-node-failure-action ${pnode(0000)} "nonfatal"

$ns rtproto Static
$ns run
That looks nothing like the file we gave to containerize.py, but it does show us a little about what the containers system has done. The single physical node (pnode(0000)) will run the CentOS6-64-openvz image and run on a few kinds of node. On startup pnode(0000) will execute a command from the same /share/containers directory that containerize.py ran from using data in the per-experiment directory /proj/DeterTest/exp/example1/containers/site.conf.
There is a separate /proj/DeterTest/exp/example1/containers/ directory for each experiment. The path element fater /proj is replaced with the project under which the experiment was created, DeterTest in this example, and the element after exp is the experiment name, example1 in this case. These directories are created for all DETER experiments. The containers sub-directory holds information specific to a containerized experiment.
There are a few useful bits of data in that per-experiment containers directory that we can look at. To avoid the long pathname we will talk about files in containers/, the subdirectory.
First, a copy of the topology that we gave to containerize.py is available in /proj/DeterTest/exp/example1/containers/experiment.tcl. If the experiment is created from a topdl file, the filename will be containers/experiment.tcl.
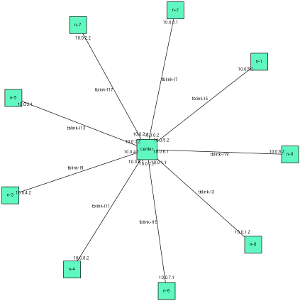
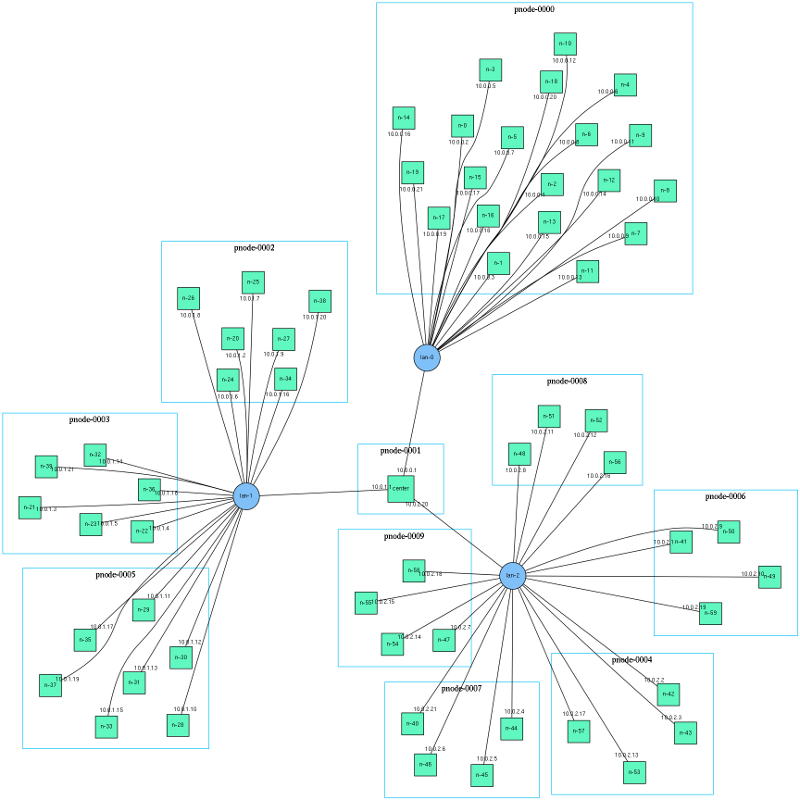
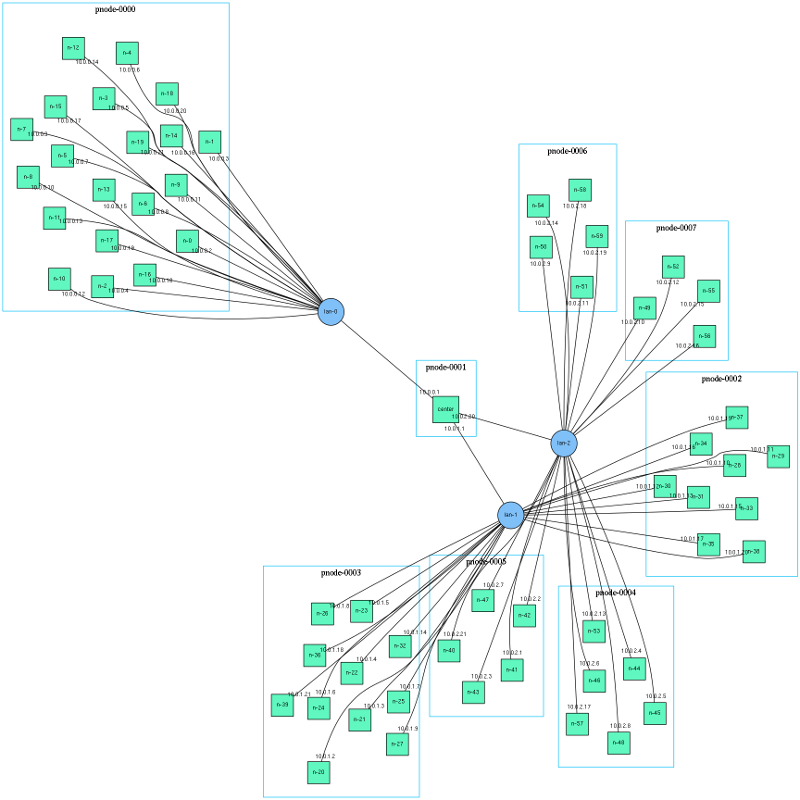
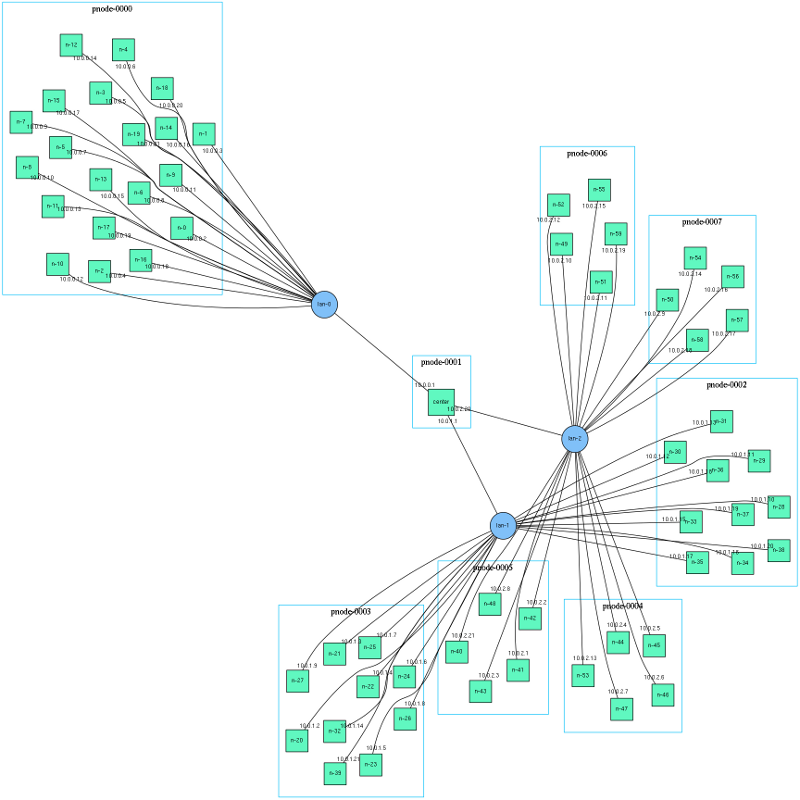
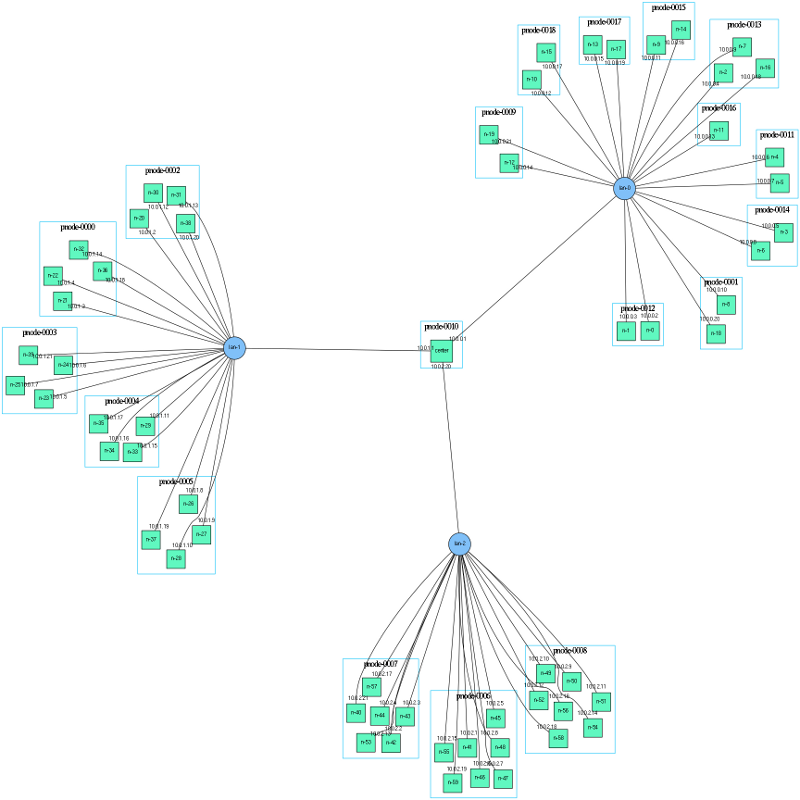
A simple vizualization of the experiment is in containers/visualization.png. This is annotated with node and network names as well as interface IP addresses. The topology depiction above is an example. A larger version is also attached.
Attachments (18)
-
experiment-page.png (110.1 KB) - added by 12 years ago.
Containerized Experiment page
-
hilighted.png (198.1 KB) - added by 12 years ago.
Highlighted experiment page
-
example2.tcl (411 bytes) - added by 12 years ago.
Example with 7 satellites
-
loose.png (98.4 KB) - added by 12 years ago.
View of a loose packing
-
example1.tcl (411 bytes) - added by 12 years ago.
Simple star topology
-
example3.tcl (592 bytes) - added by 12 years ago.
Example of setting node_types
- example4.tcl (731 bytes) - added by 12 years ago.
-
example5.tcl (686 bytes) - added by 12 years ago.
Example of setting openvz parameters
-
embedded_pnode.png (101.1 KB) - added by 12 years ago.
A view with an embedded pnode
-
visualization.png (39.8 KB) - added by 12 years ago.
Larger version of teh visualization
-
visualization-small.png (18.0 KB) - added by 12 years ago.
Small view of the experiment
-
packing.png (185.8 KB) - added by 12 years ago.
Packing experiment topology
-
packing-small.png (31.2 KB) - added by 12 years ago.
Packing experiment topology (small)
-
example6.tcl (504 bytes) - added by 12 years ago.
Packing example
-
example6-smaller.png (152.8 KB) - added by 12 years ago.
Partitions (simple)
-
example6.2-smaller.png (163.9 KB) - added by 12 years ago.
Looser packing
-
example6.3-smaller.png (165.9 KB) - added by 12 years ago.
no network constraints
-
example6.4-smaller.png (151.8 KB) - added by 12 years ago.
Mixed packing and sizes
Download all attachments as: .zip