| Version 12 (modified by , 12 years ago) (diff) |
|---|
Table of Contents
Using Containers
A containerized virtualization system currently runs on the DETER testbed.
We support two types of experiments: qemu auto-partitioned and mixed mode. Nodes in a qemu auto-partitioned experiment are realized as either qemu virtual machines or physical nodes. The qemu nodes are automatically packed into physical nodes based on a packing parameter. Nodes in a mixed mode experiment may be qemu virtual nodes, lightweight processes, or physical machines. All non-physical nodes must be embedded manually.
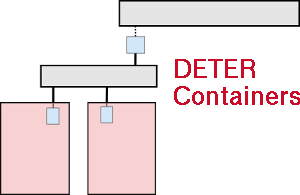
How it works
The container system is built on the legacy DETER functionality. This means that a containerized experiment appears to the DETER testbed and web interface as a typical experiment. The NS file for the host experiment is annotated with a variety of container-related commands.
You will interact with your containerized experiment through facilities provided by DETER. The swap in/out process is controlled by the DETER web interface, and you will access your virtual nodes like any other node from users.isi.deterlab.net.
Getting Started
Prerequisites
Prepare your NS or TopDL file as you would for any other DETER experiment.
Before running your experiment you should determine the DETER PID and EID under which you'll run the experiment. The EID should not refer to an existing experiment.
Containerizing Your Experiment
The containerize.py program creates a DETER experiment made up of containers. There will generally be more containers than there are DETER nodes in your new experiment. The containerize.py program is available from /share/containers/containerize.py on users.isi.deterlab.net. A sample invocation is:
$ /share/containers/containerize.py MyProject MyExperiment ~/mytopology.tcl
It will create a new experiment in MyProject called MyExperiment containing the experiment topology in mytopology.tcl. All the topology creation commands supported by DETER are supported by the conatainerization system, but systems like program agents are not. Start commands are supported.
Either an ns2 file or a topdl experiment is supported. Ns2 descriptions must end with .tcl or .ns. Other files are assumed to be topdl descriptions.
By default, containerize.py program will partition the topology into openvz containers, packed 10 containers per physical computer. If the topology is already partitioned - at least one element has a partition atttribute - containerize.py will not partition it. Similarly, if container types have been assigned to nodes, containerize.py will respect them.
It takes several parameters that can change its behavior:
--default-container=kind- Containerize nodes without a container type into kind. If no nodes have been assigned containers, this puts all them into kind containers.
--force-partition- Partition the experiment whether or not it has been paritioned already
--packing=int-
Attempt to put int containers into each physical node. The default
--packingis 10. --config=filename- Read configuration variables from filename the configuration values are discussed below.
--debug- Print additional diagnostics
This invocation:
$ ./containerize.py --packing 25 --default-container=qemu --force-partition DeterTest faber-packem ~/experiment.xml
takes the topology in ~/experiment.xml (which must be topdl), packs it into 25 qemu containers per physical node, and creates an experiment called DeterTest?/faber-packem that can be swapped in. If experiment.xml were already partitioned, it will be re-partitioned. If some nodes in that topology were assigned to openvz nodes already, those nodes will be still be in openvz containers.
The result of a successful containerize.py run is a DETER experiment that can be swapped in.
Creation
Upon successful creation, you will be presented with a URL for accessing your experiment via the web interface.
It takes 1-2 minutes for DETER to create the experiment. The creation process has successfully completed once DETER reports "Status: swapped" on the Experiment Activity Log. (The actual output generated by running containerize.py is "Containerized experiment PID/EID successfully created!")
Viewing the Experiment
The DETER web interface shows the physical topology that a containerized experiment is embedded in. This is of some use, but most experimenters want some way to see how their nodes are placed in the physical DETER computers. The {{{container_image.py}} program can draw simple pictures of containerized experiments and show which physical nodes hold which virtual nodes.
A common way to invoke container_image.py is:
$ /share/containers/container_image.py --experiment DeterTest/faber-packem --out packem.png
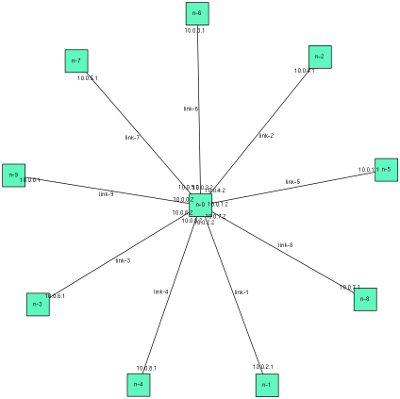
That will result in an image of the topology annotated with node names and IP addresses. For example, this tcl file:
source tb_compat.tcl

set ns [new Simulator]
source tb_compat.tcl

for { set i 0 } { $i < 10 } { incr i} {
    set n($i) [$ns node]
}

set k 0
for { set i 1} { $i < 10 } { incr i } {
    set link($i) [ $ns duplex-link $n(0) $n($i) 100Mb 10 ms DropTail]
}


$ns rtproto Static
$ns run
results in this image (reduced):

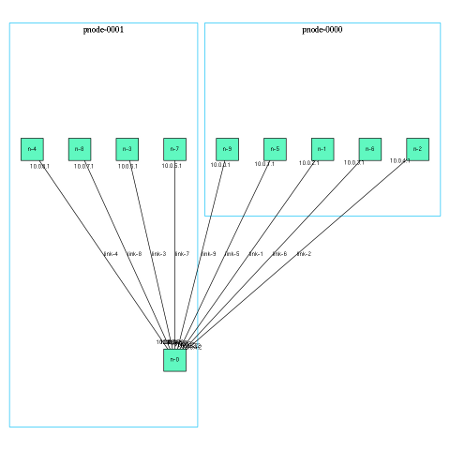
Giving the --partitions option adds information about which physical nodes the containers are hosted on:

This system is not useful for large experiments, but is a simple way to view small ones.
Swapping
Just like a standard DETER experiment, no resources are allocated to a containerized experiment until it is swapped in.
Swapping in
Swap in the DETER experiment like any other: click the "Swap Experiment In" link on the left side of the experiment page.
From DETER's perspective, the swap in process should complete in 3-5 minutes, at which point you will be notified "Experiment successfully swapped in".
After this, it takes another 3-5 minutes to set up the physical nodes and launch the virtual nodes. This process is complete when the "Startup Status" for each node is reported as 0 or 1.
If the startup status is 1, there was an error setting up the physical node as a virtual host. Please let me know if this happens and I can see what caused the problem. You can always try to swap in and out to see if the problem resolves itself.
Swapping out
Swap the experiment out like any other.
Modifying the experiment
We do not currently support any form of experiment modification. If you wish to modify your experiment, you must terminate the DETER experiment (not just swap out, but properly terminate) and then start a new containerized experiment using the process outlined above.
Accessing Nodes
Nodes are accessed similarly to other DETER nodes. When you are on users, you can access a node named 'node-1' in YourPID/SomeEID using SSH:
users$ ssh node-1.someeid.yourpid
node-1$ echo hello from qemu
hello from qemu
Note: This does not yet work with physical nodes in mixed-mode experiments. Sorry!
From within the experiment you can communicate with other nodes in the experiment using just the hostname, as in an ordinary DETER experiment:
node-1$ ping node-2
PING node-2-big-lan (10.0.0.32) 56(84) bytes of data.
64 bytes from node-2-big-lan (10.0.0.32): icmp_req=1 ttl=64 time=8.01 ms
64 bytes from node-2-big-lan (10.0.0.32): icmp_req=2 ttl=64 time=10.6 ms
^C
--- node-2-big-lan ping statistics ---
2 packets transmitted, 2 received, 0% packet loss, time 1001ms
rtt min/avg/max/mdev = 8.015/9.318/10.622/1.307 ms
Node list
The node_list command takes an extra flag -e or --extra to list extra nodes from your experiments. Use it like so:
users$ node_list --extra
YourPID/some-experiment
    pnode-0001.some-experiment.YourPID / pc003
    pnode-0000.some-experiment.YourPID / pc038
  extra nodes:
    node-1.some-experiment.YourPID
    node-2.some-experiment.YourPID
    node-3.some-experiment.YourPID
    node-4.some-experiment.YourPID
    node-5.some-experiment.YourPID
    node-5.some-experiment.YourPID
This makes use of the experiment.extra_nodes XML-RPC method. This method takes two arguments: proj and exp, which are PID and EID respectively.
Start commands
Start commands are similar to Emulab start commands, with a few notable exceptions:
- start commands inside containers are run at each boot, instead of just once
- there is no way to report the exit status of a start command (yet)
You can see the exit status and output of a start command by logging into a node and looking in /var/benito/log/start_command.*. There should be 3 files:
start_command.log: general info, including exit statusstart_command.out: stdout from the start commandstart_command.err: stderr
Node Status
There is a line-based RPC mechanism for query node status. A web interface for this is in active development.
Commands are in the format: command arg1 [arg2 ...]
Replies are in the format: reply_type python-eval'able-string
As an example, here is a status request and reply (reply line-wrapped for readability):
status_request DeterTest/ratsnest-medium
status_reply {'hv:qemu:pnode-0000': {'cnode17': [None, None], 'cnode20': [None,
None], 'cnode8': [None, None]}, 'hv:qemu:pnode-0010': {'lnode6': [None, None],
'lnode7': [None, None]}, 'hv:qemu:pnode-0005': {'lnode11': [None, None],
'lnode12': [None, None], 'lnode13': [None, None]}, 'hv:qemu:pnode-0004':
{'lnode4': [None, None], 'lnode1': [None, None]}, 'hv:qemu:pnode-0007':
{'cnode16': [None, None], 'cnode15': [None, None], 'cnode19': [None, None]},
'hv:qemu:pnode-0008': {'cnode14': [None, None], 'cnode9': [None, None],
'cnode18': [None, None]}}
Example Python code for parsing the reply:
from ast import literal_eval
type, body = line.split(' ', 1)
message = literal_eval(body)
Reply format
Reply bodies take the form of a dict of dicts. The key of the first level of dicts is the hypervisor name. The key of the second level is node name. Each node name is a two-item array. The first element is boot status and the second element is start command exit code or qemu process exit code (if dead). Both of these will be None if the hv is unreachable.
Possible boot status:
running- qemu has been started but the OS has not bootedbooted- the inner OS has fully booteddead- qemu process has died
Caveat
Note: Node status is only available for qemu virtual nodes. If your experiment is mixed mode, there is no status available for pnodes. The only way to query their status is from DETER. If they've booted and their exit code is 0, then they are running.
What's Missing
The following is a list of missing features that will probably cause you some pain and suffering. Actually implementing these features is my highest priority task at the moment, so please bear with me for the time being.
- Accessing physical nodes via hostname from
users - Ability to choose a different OS than Ubuntu 12.04 (Pangolin) under Qemu
Attachments (2)
-
test1-smaller.png (27.9 KB) - added by 12 years ago.
Star topology image
-
test-smaller.png (31.9 KB) - added by 12 years ago.
Start topology with partitions
Download all attachments as: .zip